Our yearning for seamless job completion is almost magical. While this isn’t possible, Salesforce recognizes our needs and has automated processes. This includes emailing event notices and automatically updating records. Salesforce’s automation technologies make these operations seem effortless.
Please take a moment to read my latest blog onSalesforce Developer Versions.
For this, Salesforce provides triggers, process builders, workflows, and flows. Future tools may ease automated procedures. After December 31, 2025, Salesforce will terminate Workflow Rules and Process Builder. Flows allow non-coders to automate without coding. In this article, I’ll quickly discuss Flows and show their Salesforce automation tool use.
INTRODUCTION TO SALESFORCE FLOWS
Salesforce Flow is a formal automation tool that is simple to use and lets you build complicated business automation solutions with just a few clicks.
You can do many things with Salesforce Flows, such as sending emails, making posts in Chatter, sending custom alerts, and more. It inserts, updates, and deletes records by setting off events. It works perfectly before and after events.
Currently, we have the following 6 types of flows:
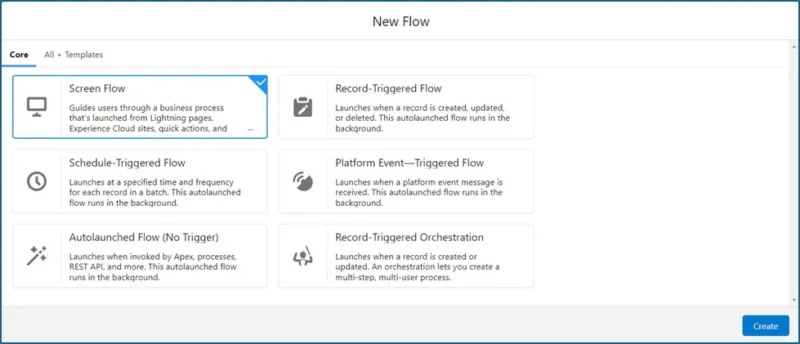
1. Screen Flow
Screen flows employ unique UI to lead users through business processes. This flow allows user participation. Any record-based operation may be done with it. Screen flow may have one or more screens with adjustable, reusable elements.
2. Record Triggered Flow
Record-triggered flow starts when a record is added, changed, or removed.This flow that starts itself runs in the background.
In Record Triggered Flow, you can configure when to execute the actions:
· Fast Field Update (Before Save):
When we need to do something on the starting record before it is saved, like filling in a field or validating it, we do this.
· Actions and Related Records (After Save):
Whenever we need to do something after the record has been saved, like make, update, or delete records of items that are linked or unrelated, and do things like send an email or a bell notice.
3. Scheduled Triggered Flow
For each record in a batch, this flow starts at a certain time and frequency. This flow runs in the background and starts automatically. There is no other way to start a flow that is set to run at a certain time. To plan the flow based on the start date and time, you can only use the following frequencies:
- Once
- Daily
- Weekly
4. Auto-Launched Flow (No Trigger)
The user doesn’t have to do anything to start the auto-launched flow; it starts when Apex, processes, REST APIs, and other things call it. This flow starts on its own and runs in the background.
5. Platform Event Triggered Flow
When an event happens in Salesforce, a platform event-triggered flow will be run. The person doesn’t have to do anything for this flow to happen in the background.
For example, Let’s say we have created a screen flow, and at the time of execution of that screen flow, there is an error. If we want to perform any action whenever an error occurs, we’ll use a platform event-triggered flow. Those actions could include storing the details of that error in an object or sending an email about its occurrence.
6. Record Triggered Orchestration Flow
Before understanding this flow, define orchestration. Orchestration has various actions and components at each level. Orchestration lets you design multi-step, multi-user processes. Thus, when we create or edit the record, this flow will be activated, and specific phases will be performed. This flow isn’t run on record deletion.
BUILDING BLOCKS OF FLOW
There are 3 main “building blocks” of any flow:
1. Elements
The components of a flow resemble Lego blocks, each serving a distinct purpose to help you accomplish various tasks. These do things that make sense, like loops, choices, or tasks.There are also data elements that can query the database or save changes to records.
2. Connectors
Connectors show which part leads to which other part. Auto-Layout is turned on in Winter ’21, and the Elements are instantly linked together.
3. Resources
Resources are the individual variables of data that are to be used in a flow—these can be strings of text, numbers, records, formulae, or collections.
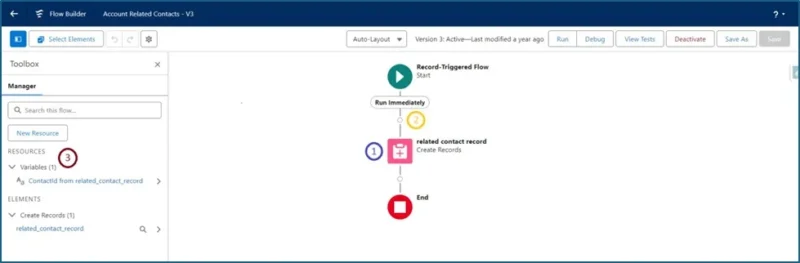
You can see these in action on the Flow Canvas below.
SALESFORCE FLOWS LIMITS AND CONSIDERATIONS
- In API version 0, the limit of 2000 flow elements were removed. In API version 56.0 and earlier, flows could have a maximum of 2000 flow elements.
- General Flow Limits:
- Versions per flow: 50
- Active flows per flow type: 5 in PROFESSIONAL EDITIONS and 2000 in all others
- Total flows per flow type: 5 in PROFESSIONAL EDITIONS and 4000 in all others
· Per-Transaction Flow Limits:
- Totalnumber of SOQL queries issued:
- Totalnumber of records retrieved by SOQL queries: 50,000.
- Totalnumber of DML statements issued:
- Totalnumber of records processed as a result of DML statements: 10,000.
Click here to learn more.
BEST PRACTICES OF FLOWS
To maximize the benefits of Salesforce Flow, it’s crucial to adhere to certain best practices.
- Planout your flow before you start
- Buildyour flows in a test environment—like a sandbox or Developer Edition
- Neverhard-code Salesforce
- Waituntil the end of the flow to edit the
- Avoidcreating records before the first screen in the
- Controlwhen running users can navigate
- Providean error
- Saveearly and
- Test asmany permutations of your flow as you possibly can. Click here to learn more about salesforce best practices.
USE CASE
As we have discussed much about flows, let’s look at a use case to understand much better.
In our scenario, we will utilize the data table component within a ScreenFlow. We aim to display a table containing all related Contacts and Account record detail pages. Subsequently, we will update the phone numbers of the selected contacts.
With the Winter ’23 release, it’s now possible to create flows without needing to search in the quick find box.

I have created a Screen flow and selected datable component on the screen.
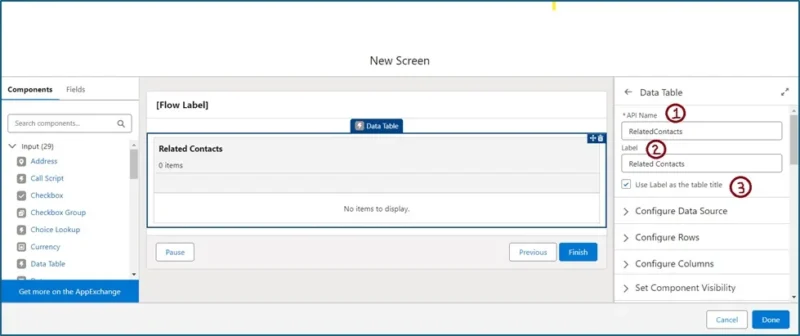
1. API Name
This is the API name of the data table.
2. Label
It will automatically get selected from the API name.
3. Use Label as the table title.
The default value if unchecked, and if you check this checkbox, it will use the label you defined as the title of the data table.
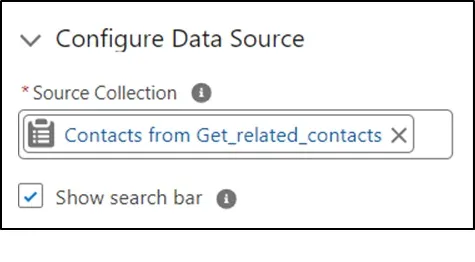
Next is the Configure Data Source, the records you would like to display in the table. It will have to be a record collection variable. We also have a option to show a search bar, if we check this, it will display a search bar on the data table.
The possibility to choose either multiple records, one record, or no selection at all (view only).

· Minimum / Maximum Row Selection
It only shows up if you allow for multiple selections. You can define how many records the user can choose. As in this example, I have described the minimum selection as 1; if I don’t select any row before moving further, it’ll throw an error, and in case of maximum selection, I have defined three rows, so choosing a 4th row will be unable/ read-only.
· Default Selection
This only shows up if you allow for selection (multiple or single). It only accepts record collection variable. If the records in the default selection do not exist in source collection, this setting will be ignored.
You can configure each column separately. This is to choose which field to display.
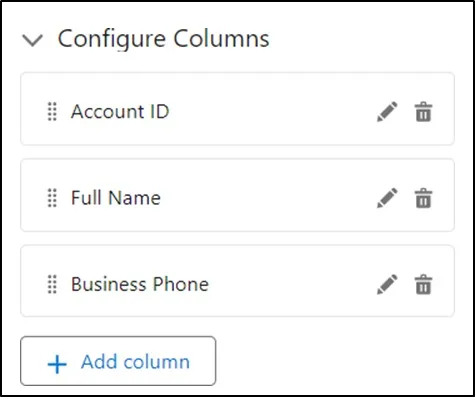
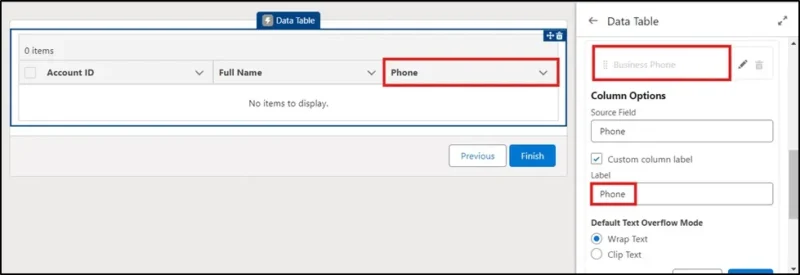
We can also use custom labels for each column, and it will be displayed on the data table. Default Text Overflow Mode defines how the text in column will be shown if the text is too long.
Here is the entire flow for our use case, which includes the data table in the screen flow.

FLOW INTERVIEW
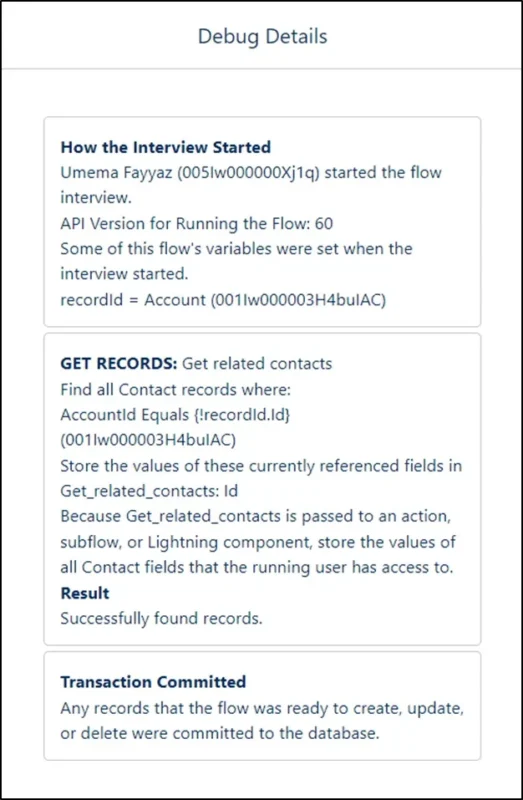
Every time a flow is executed, a flow interview starts, representing an instance of that flow. Each interview may take a unique route through the flow and trigger different actions based on the data supplied through input variables or input components on a screen. You can debug your existing flow directly from Flow Builder to observe how the interview operates. Navigate to Flow Builder and select Debug. Click on Run. Review the debug details; first, the card explains how the interview started (A user started the flow interview), and then it followed the path (actions) in the flow.
NOTE
- TheActions and Related Records option is not available in case of
- Onlyone version of each flow can be active at a
- Someresources, such as global constants and global variables, are provided by the
- We should not use any DML operation in before save flows, since you are working on the recordbefore it even goes into the database, you just need to set the field values you want through assignment element and that’s it.
SUMMARY
Today, I explained Salesforce Flows, their kinds, recommended practices, limits, and more. Flow has unlimited uses and is expanding with every Salesforce version. This blog showcases a use case for using data tables in Salesforce Screen Flow. I want to explore additional Salesforce use cases and fascinating facts in future articles.
